
Practical Setup and tools
In the previous “Using a GSM tester” post, we examined the theoretical aspect of the fake base station attack. Today, we will focus on more technical details, discussing about the equipment needed, and the setup required for the implementation of the attack.
The ideal setup for this type of attack consists of an industrial mobile telephony base station, like the ones used by network operators. This would of course be too expensive and complex to set up complicated, so an easier solution exists, using off-the-self GSM testing equipment. GSM handset testing equipment can implement a great deal of the functionality of base stations, in a compact device with an easy-to-use interface. They provide all the necessary signalling for the normal operation of handsets (including of course voice and SMS), while they can also demodulate voice and decode SMSs from the digital signal transmitted in the air. As their name implies, they are used to test the operation of handsets, detecting all possible kinds of failures, thus directing the technician to the correct steps needed to repair a faulty handset. An old tester (however fully capable, as we will see), can be bought in the second-hand market for as little as 200 Euros. The picture below shows a typical 20-year old GSM tester. The more modern models are a fraction of its size and weight.
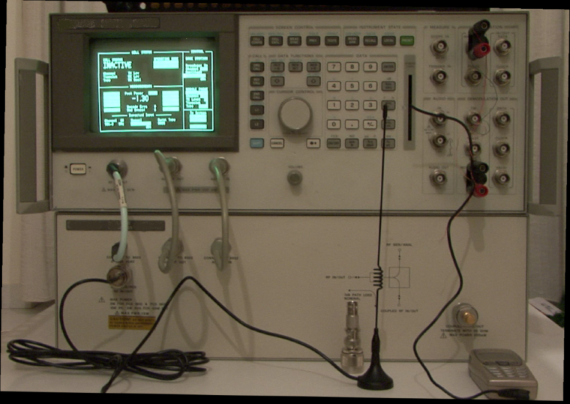
An older typical GSM tester
Testers need to be connected to the phone being tested via cable or wirelessly, using an antenna. Needless to say, a cable connection would not be very practical when trying to launch an attack against a target. So the wireless connection is the way to go. During their connection with the handset, they play the role of the telephony provider while they are performing a wealth of measurements, pinpointing even the slightest problem and malfunction in the operation of the phone. A typical screen can be seen in the next image.
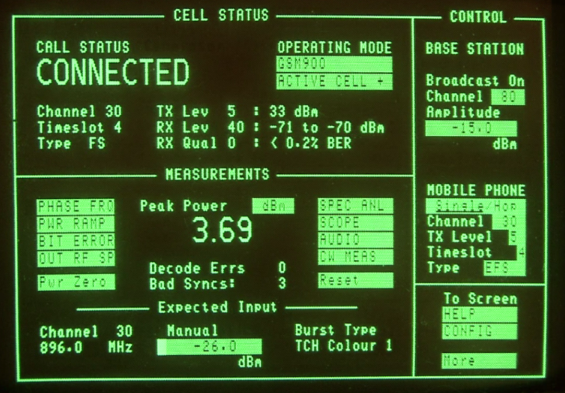
Typical measurements performed by the tester
GSM testers can also intercept the IMSI (International Mobile Subscriber Identity) of the user’s SIM (Subscriber Identity Module) card and the IMEI (International Mobile Equipment Identity) of his handset. It is exactly their ability to intercept IMSI that has led to the name “IMSI catcher” being collectively used to describe this family of equipment. At the same time, they can read the short messages (SMS) that the user is sending. A malicious user can further initiate calls or send messages to the victim, choosing freely any caller identity he pleases.
A very interesting fact is that not only plaintext messages, but also specific binary ones can be send towards the handset. Such messages are normally restricted or used exclusively by the provider and blocked in case a normal user tries to send them. Using this equipment, the validity check is circumvented since the attacker plays the role of the provider, and a whole new category of attacks opens.
In the past few years, research in open source software and hardware has led to the creation of “private” base stations, running open source software. Costing a fraction of a real base station, they duplicate most of its functionality, proving a valuable tool for research (and possibly for fraud too). So, apart from a GSM tester, it is also possible to use hardware and software from the open-source projects such as OpenBTS. This is a project that uses a software radio to present a GSM air interface to standard GSM handset and uses a SIP softswitch or PBX to connect calls. There is also the project OpenBSC that implements higher-level functionality and needs a hardware BTS to operate. While much more versatile and fully customizable, these variants are far more complicated than just using an off-the-shelf GSM tester, so we’ll address them in a future article.
We will now continue with the description of the attack using just a GSM tester, which is considerably easier to operate, with minimal training needed, as already noted.
All in all, in order for the attacker to launch the attack, the following tools are needed:
A GSM tester such as the one mentioned above
An antenna
A GSM repeater-amplifier (optionally, in order to increase the effective range of the interception)
A mobile handset with monitoring software installed or enabled (further explained below)
A second mobile phone or land line in order to “channel” the interception communication through it. This phone is connected to the audio in/out outputs of the audio demodulator circuit of the GSM tester, as seen on the first picture above.
A PC with a serial port or other connectivity would enable the full automation of the process. In any case, the connection details are straight forward and need not be presented here.
Parameterization of the fake base station
Following the proper connection of the equipment, the necessary parameterization has to take place. The required data that should be set are, first of all, the country number (MCC – Mobile Country Code) and the mobile telephony network number (MNC – Mobile Network Code) of the SIM of the mobile phone to be intercepted. ITU-T E.212 defines the notion of Mobile Country Codes (MCCs) for use in identifying the country of origin of mobile stations in wireless telephone networks, particularly GSM and 3G networks. It also defines Mobile Network Codes (MNCs) that further discriminate operators in a given country. As such, the MCC/MNC combination is universally unique for each operator. The exact MCC/MNC combinations can be found in ITU publication: “Operational Bulletin No.992 (15.XI.2011) and Annexed List: Mobile Network Codes (MNC) for the international identification plan for public networks and subscriptions”. This information is freely available, and can even be accessed by special menus in mobile phones or other diagnostic tools. The following table shows the relevant entries for Greece. Therefore, the attacker must choose the correct MCC/MNC, to imitate the provider of the victim.
MCCs and MNCs for Greece.
MCC Country MNC Operator
202 Greece 01 Cosmote
202 Greece 05 Vodafone
202 Greece 10 WIND
Next, Netmonitor mode (or Engineering Menu or Field Test Display) needs to be used to gather the original-legitimate network’s operating parameters. Netmonitor is a special mode (or application) in mobile phones, used to measure network and phone operating parameters and status. When activated in older phones, a new, additional menu usually appears, providing a wealth of information. Newer phones have applications that can be installed for the same goal.
The most important information that Netmonitor provides for the needs of the attack is the ARFCNs (absolute RF channel numbers) that nearby GSM base stations BCCHs (broadcast control channels) transmit in. BCCH is a signalling channel that carries information about the identity, configuration and available features of the base station. Mobile phones continuously “listen” to that broadcast signal in order to be able to communicate with the GSM network. This channel also provides a list of ARFCNs used by neighbouring base stations, to facilitate hand-over to cells that are closer or are more powerful. Since the handset is continuously monitoring a specific list of channels, the attacker must choose one out of these channels in order to transmit. If the attacker transmits in a frequency that is not among the list of ARFCNs, then the mobile phones in the area will not be able to pick up the signal and camp to the base station and the attack will fail. So, by transmitting at the correct channel, the attacker will effectively be masking the legitimate signals and will be seizing control of the nearby mobile phones, deceiving them to connect with him instead with the provider. Below, you can see a screenshot from a Netmonitor–enabled phone, providing information about BCCHs in the vicinity of the phone. We can see 6 BCCHs along with the selected one, ordered by signal strength).
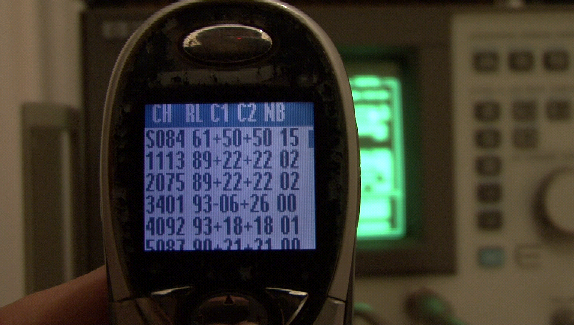
Netmonitor showing the current and the “neighbouring” channels
As you can see in the next picture, a few moments after the operation of the GSM tester, the “victim” phone connects onto the fake base station according to GSM standards procedures. Specifically, the GSM tester is transmitting in BCCH channel 84 (which was the already selected channel by the handset before the “intrusion” as was depicted in Fig. 3). The received signal from the GSM tester, overpowers the legitimate signal since the transmitter is far closer than the antenna of the base station of the network provider. It is also interesting to note that in the specific setup the BCCH is instructed not to advertise any other BCCHs (hence the rest of the neighbouring channels are set to 00). This is an important step, because even if the phone moves closer to another base station, it will not switch to that, unless the signal of the fake base station is completely lost. This way, it’s easier for the attacker to maintain connection with the victim, which would otherwise be lost the moment the mobile phone entered an area served by a base station with better characteristics than the fake one. The final step in the process is to deactivate the encryption by choosing the A5/0 algorithm as described in our previous blog post.
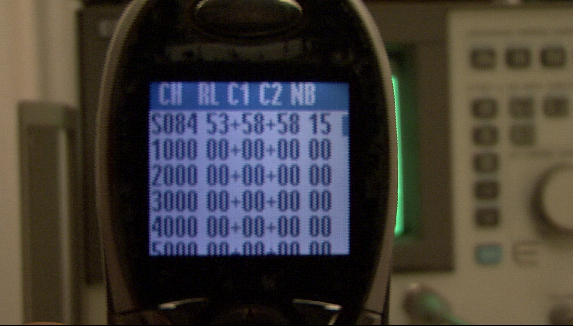
Victim phone has camped-on to the fake base station
After taking this step, every call attempt originating from the cell phone will be logged by the GSM tester. As we can see below, among other things, the IMSI, IMEI, and the number that the user is trying to dial are decoded and recorded. One merely has to dial the number requested (444444 in our example) by the “victim” phone, using the second phone that will actually make the call, channeling the communication, as in the classical concept of the man-in-the-middle attack. The conversation-relaying phone is connected to the audio in/out outputs of the audio demodulator circuit of the GSM tester. The originally requested number can be dialled manually, or via a connection with a PC, controlling the phone and sending the correct command to dial a specific number. The drawback of this method is that the caller-ID of the relaying phone will appear to the originally called party. This is why the calling line identification restriction service (CLIR) is enabled, as to withhold the ID. Of course, the recipient of the call might get suspicious, that is why an even better solution is to employ a VoIP server to channel the conversation. This way, by subscribing to any VoIP service provider that allows its clients to freely set their caller-ID, the attacker can set the victim’s caller ID to appear in the outgoing call.
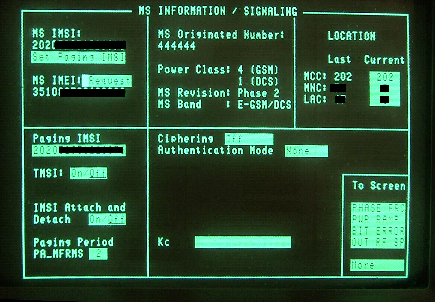
Details of IMSI, IMEI and calling number, available to the GSM tester
In the next article we will examine the behaviour of different mobile phones in the presence of a fake base station. Quite interestingly, as we will see, older phones seem to be paying more attention to security than new models!